|
1 2 3 4 5 6 7 8 9 10 11 12 13 14 15 16 17 18 19 20 21 22 |
1.获取当前时间的 时间戳 Date.parse(new Date()) 结果:1486347562000 2.获取当前 时间 new Date() 结果:Mon Feb 06 2017 10:19:42 GMT+0800 (CST) 3.将 时间戳 转换成 时间 new Date(1486347562000) 结果:Mon Feb 06 2017 10:19:22 GMT+0800 (CST) 4.将 时间 转换成 时间戳 Date.parse(new Date("2017-02-06 10:30:50")) 结果:1486348250000 |
根据窗口大小改变悬浮窗显示方式并自动刷新页面
|
1 2 3 4 5 6 7 8 9 10 11 12 13 14 15 16 17 18 19 20 21 22 23 24 25 26 27 28 29 30 31 32 33 34 35 36 37 38 39 40 41 42 43 44 45 46 47 48 49 50 51 52 53 54 55 56 57 58 59 60 61 62 63 64 65 66 67 68 69 70 71 72 73 74 75 76 77 78 79 80 81 82 83 84 85 86 87 88 89 90 91 92 93 94 95 96 97 98 99 100 101 102 103 104 105 106 107 108 109 110 111 112 113 114 115 116 117 118 119 120 121 122 123 124 125 126 127 128 129 130 131 132 133 134 135 136 137 138 139 140 141 142 |
如果一个页面有个浮动的二维码,当页面窗口缩小时二维码会遮盖住页面内容,这时候可以根据浏览器大小来决定显示方式: 1.当页面宽度足够大时,完全显示二维码 2.当页面窗口缩小时,这时候需要显示一个按钮,点击按钮才显示二维码 这时候需要添加onresize来监听窗口变化,以此来刷新页面: window.onresize = function() { //监听窗口变化 window.location.reload(); //兼容chrome safari window.location.href = ""; //兼容火狐 } 至于上面二维码的显示方式,在 vue 里使用 v-show 实现非常方便: HTML: <!-- 按钮 --> <div class="qr-btn" v-show="qrBtn" @click="showQr"><img src="../assets/images/tangulunyin.jpg" alt="谈股论银"></div> <!-- 二维码 --> <div class="qr-code" v-show="qrCode"> <ul> <li><img src="../assets/images/yinruyi.png" alt="银如意" title="银如意"><span>扫描下载银如意app</span></li> <li><img src="../assets/images/tangulunyin.jpg" alt="谈股论银"><span>扫描关注谈股论银公众号</span></li> </ul> </div> CSS: .qr-btn { width: 30px; height: 30px; background-color: #064491; display: block; position: absolute; left: 20px; bottom: 50px; border-radius: 50%; box-shadow: 2px 2px 8px rgba(0, 0, 0, .6); cursor: pointer } .qr-btn>img { width: 20px; height: 20px; position: relative; top: 5px; display: block; padding: 0 auto; margin: 0 auto; } .qr-code { position: fixed; bottom: 10%; left: 1%; background-color: aliceblue; font-size: 12px; text-align: center; } .qr-code>ul>li { padding: .8em; } .qr-code>ul>li:last-child { margin: 0 0 1em 0; } .qr-code>ul>li>img { width: 130px; height: 130px; display: block; } VUE: export default { data:()=>({ qrCode: false, qrBtn: false }) }, methods:{ showQr() { if (this.qrCode == false) { this.qrCode = true; } else { this.qrCode = false; } } }, ready(){ let w = window.innerWidth || document.documentElement.clientWidth || document.body.clientWidth; let h = window.innerHeight || document.documentElement.clientHeight || document.body.clientHeight; if (w < 1330) { //根据屏幕宽度决定是显示二维码还是按钮 this.qrCode = false; this.qrBtn = true; } else { this.qrCode = true; this.qrBtn = false; } window.onresize = function() { //监听窗口变化 window.location.reload(); //兼容chrome safari window.location.href = ""; //兼容火狐 } } ------------------------------------------------------------------- 以上的方法比较耗性能,而且不安全,另一个方法: VUE: export default { data:()=>({ qrCode: false, qrBtn: false }) }, methods:{ showQr() { if (this.qrCode == false) { this.qrCode = true; } else { this.qrCode = false; } }, listen() { let w = window.innerWidth || document.documentElement.clientWidth || document.body.clientWidth; if (w < 1330) { //根据屏幕宽度决定是显示二维码还是按钮 this.qrCode = false; this.qrBtn = true; } else { this.qrCode = true; this.qrBtn = false; } } }, ready(){ this.listen(); window.onresize = () => { //监听窗口变化 this.listen(); } } } |
常用 Git 命令
|
1 2 3 4 5 6 7 8 9 10 11 12 13 14 15 16 17 18 19 20 21 22 23 24 25 26 27 28 29 30 31 32 33 34 35 36 37 38 39 40 41 42 43 44 |
拉取远端仓库代码: 如果本地已经存在文件夹,先cd进去,然后敲命令: git fetch (作用是拉取远端仓库里的代码) git merge (作用是将远端仓库里的代码与本地仓库里的代码合并,如果有冲突会提示,这时候需要讲不正确的代码删除) 提交本地仓库的代码到远端仓库: git status (作用是查看仓库的状态) git add . (监控本地仓库的状态树,将本地仓库的所有变化提交到暂存区,包括文件内容修改modified以及新文件new,但是不包括被删除的文件) || git add -u(小写的u,仅监控已经被add的文件(即 tracked file),会将被修改的文件提交到暂存区。add -u不会提交新文件(untracked file) || git add -A (是前面两个功能的集合) git commit -m"备注信息" (作用是将代码提交到本地仓库) git log (查看git日志) git push (作用是将代码提交到远端服务器仓库) 这时候如果提示有冲突的话,我们就需要执行 git fetch 和 git merge 命令了,处理完冲突以后再重新push。 如果是第一次向远端仓库提交代码,需要执行以下命令: 首先要进入项目的文件夹,然后 git init (作用是创建本地仓库,加将会在文件夹下创建一个 .git 文件夹,.git 文件夹里存储了所有版本信息、标记等内容。注:如果整个项目文件夹是拷贝过来的,这时候需要先将文件夹内的 .git 文件夹删除后再执行init) git remote add origin git@192.168.19.154:TG/zhibo.git(作用是将本地仓库与远程仓库关联起来。如果不执行这个命令的话,每次push的时候都要指定远程服务器的地址。) 然后再执行提交命令。 版本回退: git reset --hard HEAD^ //回退到上个版本 git reset --hard HEAD^^ //回退到上上个版本 git reset --hard HEAD~100 //回退到前100个版本 git reflog //查看版本信息 git reset --hard 版本号 //回退到指定版本 用户名和邮箱: git config user.name //查看当前用户名 git config user.email //查看当前邮箱 git config --global user.name "your name that want to change" // 更改用户名 git config --global user.email xxx@xxx.com // 更改邮箱 操作远程仓库: git remote -v //查看当前仓库 git remote add <name> <url> //添加远程仓库 git remote set-url <name> <url> //切换远程仓库地址 git remote rm <name> //删除远程仓库 |
解决css3毛玻璃效果(blur)有白边问题
|
1 2 3 4 5 6 7 8 9 10 11 12 13 14 15 16 17 18 19 20 21 22 23 24 25 26 27 28 29 30 31 32 33 34 35 36 37 38 39 40 41 42 43 44 45 46 47 48 49 50 51 52 53 54 55 56 57 58 59 60 |
做一个登录页,全屏背景图毛玻璃效果,实现方法如下: HTML: <body> <div class="login-wrap"> <div class="login-mask"></div> <div class="login-box"></div> </div> <script> var w = window.innerWidth || document.documentElement.clientWidth || document.body.clientWidth; var h = window.innerHeight || document.documentElement.clientHeight || document.body.clientHeight; $('.login-mask').css("height", h); $('.login-mask').css("width", w); </script> </body> CSS: .login-wrap { overflow: hidden; } .login-mask { /* IE6~IE9 */ filter: progid: DXImageTransform.Microsoft.Blur(PixelRadius=100, MakeShadow=false); -webkit-filter: blur(100px); -moz-filter: blur(100px); -ms-filter: blur(100px); filter: blur(100px); background-image: url(../../../img/background/home-bg-3.jpg); background-repeat: no-repeat; background-size: cover; background-attachment: fixed; background-position: center; position: absolute; z-index: 1; } .login-box { width: 300px; height: 400px; background-color: rgba(255, 255, 255, 0.5); display: block; border: 1px solid rgba(183, 183, 183, 0.47); border-radius: 6px; position: absolute; left: 50%; margin-right: auto; margin-left: -150px; margin-top: 10%; z-index: 2; } |
效果如下:


可以发现边上是有白边的,这是一种blur的值很大的情况下。此时的解决方法是直接将background-size:cover;改成background-size:150% 150%;就行了。
效果图如下:

仔[……]
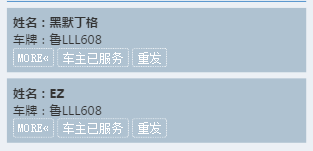
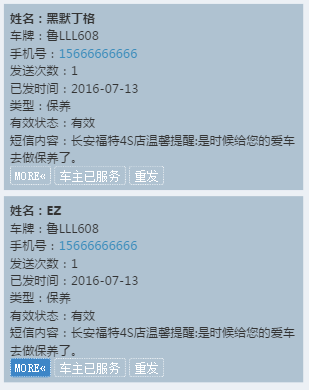
ajax循环读取json多维数组
|
1 2 3 4 5 6 7 8 9 10 11 12 13 14 15 16 17 18 19 20 21 22 23 24 25 26 27 28 29 30 31 32 33 34 35 36 37 38 39 40 41 42 43 44 45 46 47 48 49 50 51 52 |
test.json: { "one": [ { "name": "黑默丁格", "car": "鲁LLL608", "mobil": "15666666666", "mount": "1", "time": "2016-07-13", "cat": "保养", "state": "有效", "message":"长安福特4S店温馨提醒:是时候给您的爱车去做保养了。" }, { "name": "EZ", "car": "鲁LLL608", "mobil": "15666666666", "mount": "1", "time": "2016-07-13", "cat": "保养", "state": "有效", "message":"长安福特4S店温馨提醒:是时候给您的爱车去做保养了。" } ], "two": [ { "name": "机器人", "car": "鲁LLL608", "mobil": "15666666666", "mount": "1", "time": "2016-07-13", "cat": "保养", "state": "有效", "message": "长安福特4S店温馨提醒:是时候给您的爱车去做保养了。" }, { "name": "贾克斯", "car": "鲁LLL608", "mobil": "15666666666", "mount": "1", "time": "2016-07-13", "cat": "保养", "state": "有效", "message":"长安福特4S店温馨提醒:是时候给您的爱车去做保养了。" } ] } |
ajax:
效果:
禁止微信内置浏览器调整字体大小
|
1 2 3 4 5 6 7 8 9 10 |
微信webview内置了调整字体大小的功能,用户可以根据实际情况进行调节。 但是这也会导致字体大小改变以后,出现页面布局错乱的情况, 目前iOS的解决方案是覆盖掉微信的样式: body { /* IOS禁止微信调整字体大小 */ -webkit-text-size-adjust: 100% !important; } 安卓的解决方案是通过 WeixinJSBridge 对象将网页的字体大小设置为默认大小, 并且重写设置字体大小的方法,让用户不能在该网页下设置字体大小: |
|
1 2 3 4 5 6 7 8 9 10 11 12 13 14 15 16 17 18 19 20 21 22 23 24 25 26 27 28 29 30 31 32 33 34 35 36 37 38 39 40 41 42 43 44 45 46 47 48 49 |
/* * android禁止微信浏览器调整字体大小 * 这种方法会导致网页延迟大约1S */ (function () { if (typeof WeixinJSBridge == "object" && typeof WeixinJSBridge.invoke == "function") { handleFontSize(); } else { if (document.addEventListener) { document.addEventListener("WeixinJSBridgeReady", handleFontSize, false); } else if (document.attachEvent) { document.attachEvent("WeixinJSBridgeReady", handleFontSize); document.attachEvent("onWeixinJSBridgeReady", handleFontSize); } } function handleFontSize() { // 设置网页字体为默认大小 WeixinJSBridge.invoke('setFontSizeCallback', { 'fontSize': 0 }); // 重写设置网页字体大小的事件 WeixinJSBridge.on('menu:setfont', function () { WeixinJSBridge.invoke('setFontSizeCallback', { 'fontSize': 0 }); }); } })(); |
ajax+php+mysql 实现点赞、局部刷新,每个IP只能对一篇文章点赞一次
|
1 2 3 4 5 6 7 8 9 10 11 12 13 14 15 16 17 18 19 20 21 22 23 24 25 26 27 28 29 30 31 32 33 34 35 36 37 38 39 40 41 42 43 44 45 46 47 48 49 50 51 52 53 54 55 56 57 58 59 60 61 62 63 64 65 66 67 68 69 70 71 72 73 74 75 76 77 78 |
主要流程: 点赞—>判断当前设备IP是否对当前文章有过点赞记录—>若有记录,弹出提示“已经赞过了”; 若无记录,当前文章点赞数+1,并在记录设备IP点赞记录的表中插入信息。 文章表 article 必不可少的字段:article_id(必须设置为自增), cat_id, praise 图文表 image_article 必不可少的字段:article_id(必须设置为自增), cat_id, praise 设备IP点赞记录表 client_ip 必不可少的字段:id(必须设置为自增), article_id, cat_id, ip HTML部分: ({$sentence.praise}) JS部分( praise.js ): $(function (){ $(".praise").click(function () { var praise = $(this); var article_id = praise.attr("rel");//获取HTML页面POST过来的article_id var cat_id = praise.attr("rev");//获取HTML页面POST过来的cat_id $.ajax({ type: "POST", url: "praise.php", data: "article_id=" + article_id + "&cat_id=" + cat_id,//数据拼接 cache: false,//不缓存此页面 success: function (data) { praise.html(data);//显示data并局部刷新 }, error: function () { alert("error"); } }); }); }); PHP部分( praise.php ): <?php $connect = mysql_connect("数据库地址","数据库用户名","数据库密码");//链接数据库 if (!$connect){die('Could not connect: ' . mysql_error());} mysql_select_db("数据库名称",$connect);//选择数据库 $ip = $_SERVER["REMOTE_ADDR"];//获取终端IP $article_id = $_POST['article_id'];//获取article_id $cat_id = $_POST['cat_id'];//获取cat_id if (!isset($article_id) || empty($article_id) & !isset($cat_id) || empty($cat_id)) exit;//检测变量是否设置 $look = "select ip from client_ip where article_id='$article_id' and cat_id='$cat_id' and ip='$ip'"; $ip_look = mysql_query($look, $connect); //查询client_ip表中是否存在当前终端IP $count = mysql_num_rows($ip_look); //返回查询结果的记录数目 if ($count == 0) { //如果没有记录 $up_praise = "update article set praise=praise+1 where article_id='$article_id' and cat_id='$cat_id'"; $result = mysql_query($up_praise, $connect); //更新文章点赞数 $up_img_praise = "update image_article set praise=praise+1 where article_id='$article_id' and cat_id='$cat_id'"; $result = mysql_query($up_img_praise, $connect); //更新图文点赞数 $entry_in = "insert into client_ip (article_id,cat_id,ip) values ('$article_id','$cat_id','$ip')"; mysql_query($entry_in, $connect); //写入数据 } else { echo "<script>alert('已经赞过了');</script>"; } $new_praise = "select praise from article where article_id='$article_id' and cat_id='$cat_id'"; $look_new_praise = mysql_query($new_praise, $connect);//查询更新后的文章表点赞数 $new_img_praise = "select praise from image_article where article_id='$article_id' and cat_id='$cat_id'"; $look_new_img_praise = mysql_query($new_img_praise, $connect);//查询更新后的图文表点赞数 if ($arr = mysql_fetch_assoc($look_new_praise)) { $transform_arr[] = $arr;//将查询到的article表的prise转换成数组 } elseif ($arr = mysql_fetch_assoc($look_new_img_praise)) { $transform_arr[] = $arr;//将查询到的image_article表的prise转换成数组 } echo '(' . $transform_arr[0]['praise'] . ')';//打印数组值 mysql_close($connect);//关闭数据库 |
让textarea完全显示文章并且不滚动、不可拖拽、不可编辑
|
1 2 3 4 5 6 7 8 9 10 11 |
textarea { width: 100%; border: none; outline: none; resize: none; overflow: hidden; padding-bottom: 100%; background-color: inherit; } <textarea readonly="readonly"></textarea> |
浏览器滚动条样式更改
|
1 2 3 4 5 6 7 8 9 10 11 12 13 14 15 16 17 18 19 20 21 22 23 24 25 26 27 28 29 30 31 32 33 34 |
::-webkit-scrollbar { // 滚动条整体部分 width: 6px; height: 8px; } ::-webkit-scrollbar-track { // 外层轨道 background-color: #eee; border-radius: 4px; } ::-webkit-scrollbar-track-piece { // 内层滚动槽 background-color: #eee; border-radius: 4px; } ::-webkit-scrollbar-thumb { // 滚动的滑块 background: rgba(32, 33, 36, 0.3); border-radius: 4px; } ::-webkit-scrollbar-thumb:hover { background: rgba(32, 33, 36, 0.4); width: 10px; } ::-webkit-scrollbar-corner { // 边角 display: none; } ::-webkit-scrollbar-button { // 滚动条两端的按钮 display: none; } 注:目前仅Chrome下生效 |
PHP获取当前位置
如果想动态的获取当前栏目所处的位置,就要关联到数据库,下面是例子:
栏目表(category):

涉及到二级目录。
(1)首先在你的首页导航栏,还有首页所出现的链接后面,为栏目加上catid,就像这样: 。
。
当然,子页公用的导航栏也是要加上的。
(2)然后在控制[……]