全局 Git 钩子 + Husky 合并
本文说明:如何用单脚本 global-git-hooks + 符号链接,在任意环境复现「全局钩子与仓库内 Husky 链式执行」,并在指定目录下的仓库为提交标题追加 [AI]。
一、原理与数据流
- Git 只认一个 core.hook[……]
本文说明:如何用单脚本 global-git-hooks + 符号链接,在任意环境复现「全局钩子与仓库内 Husky 链式执行」,并在指定目录下的仓库为提交标题追加 [AI]。
神经网络是模仿生物神经元的一类数学模型:
输入 → 若干“层”的加权计算和非线性变换 → 输出。
单层、多层、不同连接方式,就形成了不同的“网络结构”。
[……]
OpenRGB可以调整部分外星人外设的灯光,目前不支持AW720M,在Mac上又不能安装AWCC,这一点戴尔做的属实垃圾,目前亲测成功的是,使用 Hidapi 向外设发送指令来更改灯光颜色。
整体流程:
|
1 2 3 4 5 6 7 8 9 10 11 12 13 14 15 16 17 18 19 20 21 22 23 24 25 26 27 28 29 30 31 32 33 34 35 36 37 38 39 40 41 42 43 44 45 46 47 48 49 50 51 52 53 54 55 56 57 58 59 60 61 62 63 64 65 66 67 68 69 70 71 72 73 74 75 76 |
# AW720M 灯光控制脚本(Mac) 通过 HID Feature Report 控制 Alienware AW720M 等设备的 RGB 灯光。 ## 遇到 externally-managed-environment 时(Homebrew Python) 系统禁止直接 `pip3 install` 时,可用下面任一方式,**无需手动建虚拟环境**。 ### 方式一:pipx run(推荐,零安装) 每次用 `pipx run` 自动带好 hidapi,不用激活 venv、不用改系统 Python: ```bash cd Hidapi # 首次使用需安装 pipx:brew install pipx && pipx ensurepath pipx run --spec hidapi python3 AW720M.py --list pipx run --spec hidapi python3 AW720M.py --r 255 --g 0 --b 0 ``` ### 方式二:允许 pip 安装到系统(一次安装,之后直接 python3) 接受 PEP 668 的覆盖方式,以后可直接 `python3 AW720M.py`: ```bash pip3 install --break-system-packages hidapi cd Hidapi python3 AW720M.py --list python3 AW720M.py --r 255 --g 0 --b 0 ``` ### 方式三:虚拟环境(传统做法) ```bash cd Hidapi python3 -m venv .venv source .venv/bin/activate pip install hidapi python3 AW720M.py --list python3 AW720M.py --r 255 --g 0 --b 0 ``` ## 使用 ```bash # 枚举本机 HID 设备,确认鼠标的 VID/PID python3 AW720M.py --list # 设置灯光颜色(不写死 VID/PID,按设备名称自动发现;或 --list 后用 --vid/--pid 指定) python3 AW720M.py --r 255 --g 0 --b 0 python3 AW720M.py --r 0 --g 255 --b 0 python3 AW720M.py --r 0 --g 0 --b 255 ``` (若用方式一,上述命令前加:`pipx run --spec hidapi`。) ## 提示「无法打开设备 / open failed」时 - 脚本**不写死 VID/PID**,设备 ID 从枚举结果动态获取;名称含 Alienware/AW720 等即会匹配。 1. **macOS 输入监控权限**:系统设置 → 隐私与安全性 → 输入监控 → 勾选「终端」(或你运行脚本的 App)。 2. **用 sudo 试一次**:`sudo python3 AW720M.py --r 255 --g 0 --b 0`(若这样能成功,多半是权限问题)。 3. 关闭 **Alienware Command Center、Dell 外设管理** 等可能占用 HID 的软件后再试。 4. **AW720M 请用 USB 线连接**(不要仅用蓝牙)再运行脚本。 5. **macOS 限制**:系统可能独占鼠标的 HID 接口,导致即使用 sudo 仍「open failed」。此时只能在 Windows 或 Linux 下用本脚本控制灯光。 6. 脚本会遍历所有匹配接口并尝试按 path / 按 vid:pid 打开;若仍失败,可用 `--list` 查看本机 VID:PID 后以 `--vid/--pid` 明确指定。 ## 参数说明 | 参数 | 说明 | |------|------| | `--list` | 列出所有 HID 设备(用于查看 VID/PID) | | `--vid 0xXXXX` | USB Vendor ID(不指定则按设备名称自动发现) | | `--pid 0xXXXX` | USB Product ID(不指定则按设备名称自动发现) | | `--r`, `--g`, `--b` | 红/绿/蓝 0–255 | | `--zone N` | 灯区索引,默认 0 | 协议参考 OpenRGB 的 Alienware 控制器实现。 |
Python3 脚本[……]
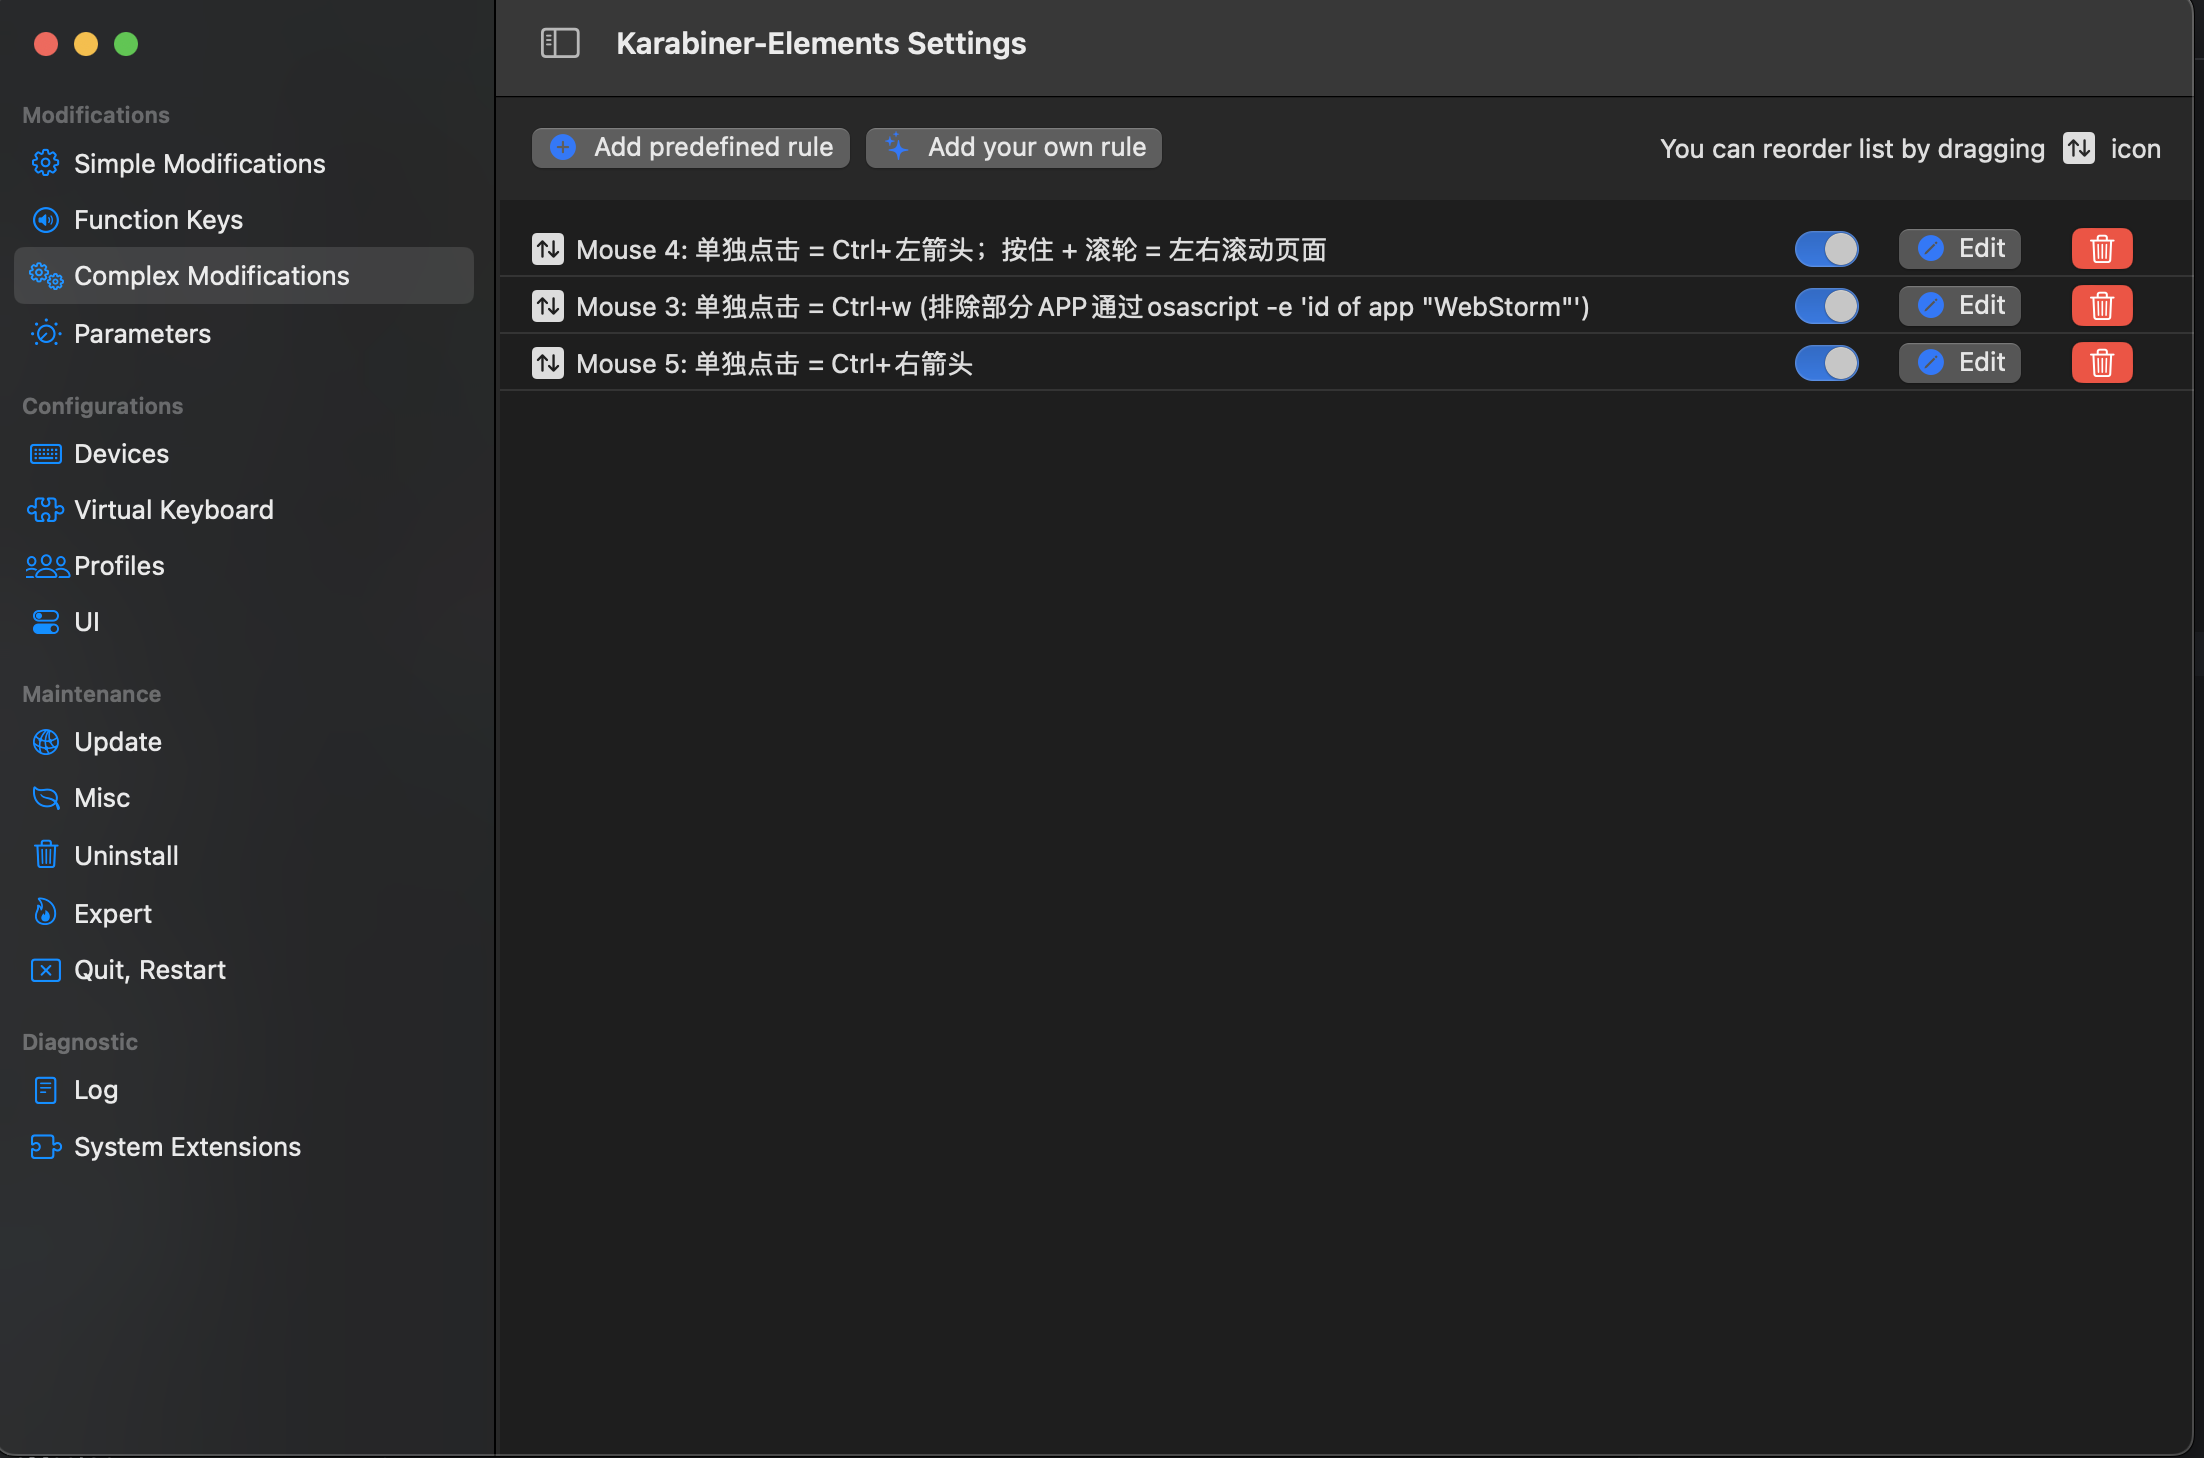
1、Mouse 4: 单独点击 = Ctrl+左箭头;按住 + 滚轮 = 左右滚动页面
|
1 2 3 4 5 6 7 8 9 10 11 12 13 14 15 16 17 18 19 20 21 22 23 24 25 26 27 28 29 30 31 32 33 34 35 36 |
{ "description": "Mouse 4: 单独点击 = Ctrl+左箭头;按住 + 滚轮 = 左右滚动页面", "manipulators": [ { "from": { "pointing_button": "button4" }, "to": [ { "set_variable": { "key_up_value": 0, "name": "button4_held", "value": 1 } } ], "to_if_alone": [ { "key_code": "left_arrow", "modifiers": ["left_control"], "repeat": false } ], "type": "basic" }, { "conditions": [ { "name": "button4_held", "type": "variable_if", "value": 1 } ], "swap": ["wheels"], "type": "mouse_basic" } ] } |
2、Mouse 5: 单独点击 = Ctrl+右箭头
|
1 2 3 4 5 6 7 8 9 10 11 12 13 14 15 16 |
{ "description": "Mouse 5: 单独点击 = Ctrl+右箭头", "manipulators": [ { "from": { "pointing_button": "button5" }, "to": [ { "key_code": "right_arrow", "modifiers": ["left_control"], "repeat": false } ], "type": "basic" } ] } |
3、Mou[……]
|
1 2 3 4 5 6 7 8 9 10 11 12 13 14 15 16 17 18 19 20 21 22 23 24 25 26 27 28 29 30 31 32 33 34 35 36 37 38 39 40 41 42 43 44 45 46 47 48 49 50 51 52 53 54 55 56 57 58 59 60 61 62 63 64 65 66 67 68 69 70 71 72 73 74 75 76 77 78 79 80 81 82 83 84 85 86 87 88 89 90 91 92 93 94 95 96 97 98 99 100 101 102 103 104 105 106 107 108 109 110 111 112 113 114 115 116 117 118 119 120 121 122 123 124 125 126 127 128 129 130 131 132 133 134 135 136 137 138 139 140 141 142 143 144 145 146 147 148 149 150 151 152 153 154 155 156 157 158 159 160 161 162 163 |
export type INDEXEDDB_PARAMS = { db_name: string; // 数据库名称 store_name: string; // 仓库名 version?: number; // 版本 data?: any; // 存储数据 }; class IDB { protected db: IDBDatabase | null; constructor() { this.db = null; this.open = this.open.bind(this); this.put = this.put.bind(this); this.get = this.get.bind(this); this.getAll = this.getAll.bind(this); this.delete = this.delete.bind(this); } // 开 open({ db_name, store_name, version }: INDEXEDDB_PARAMS) { return new Promise((resolve, reject) => { const indexedDB = (window.indexedDB = window.indexedDB || window.mozIndexedDB || window.webkitIndexedDB || window.msIndexedDB); const DB = indexedDB?.open(db_name, version); DB.onerror = (event) => { const target = event?.target as IDBRequest; console.log(`IndexedDB ${db_name} 打开失败:${target?.error?.name}`); reject(target?.error); }; DB.onsuccess = (event) => { console.log(`IndexedDB ${db_name} 打开成功`); const target = event?.target as IDBRequest; this.db = target?.result; resolve(this.db); }; DB.onupgradeneeded = (event) => { console.log(`IndexedDB ${db_name} onupgradeneeded`); const target = event?.target as IDBRequest; const _db = target?.result; if (!_db?.objectStoreNames?.contains(store_name)) { _db.createObjectStore(store_name, { autoIncrement: true, }); } }; }); } // 有则覆盖,无则新增 put({ store_name, data }: INDEXEDDB_PARAMS) { return new Promise((resolve, reject) => { const transaction = this?.db?.transaction([store_name], "readwrite"); const objectStore = transaction?.objectStore(store_name); const request = objectStore?.put(data); if (request) { request.onsuccess = () => { console.log("数据写入成功"); resolve("数据写入成功"); }; request.onerror = (event) => { const target = event?.target as IDBRequest; console.log("数据写入失败:", target?.error?.name); reject(target?.error); }; } else { reject("put error"); } }); } // 取 get({ store_name, key, }: INDEXEDDB_PARAMS & { key: IDBValidKey | IDBKeyRange }) { return new Promise((resolve, reject) => { const transaction = this?.db?.transaction([store_name], "readonly"); const objectStore = transaction?.objectStore(store_name); const request = objectStore?.get(key); if (request) { request.onsuccess = (event) => { const target = event?.target as IDBRequest; resolve(target?.result); }; request.onerror = (event) => { const target = event?.target as IDBRequest; console.log( `${store_name} 获取数据 ${key} 失败:`, target?.error?.name ); reject(target?.error); }; } else { reject("get error"); } }); } // 全取 getAll({ store_name }: INDEXEDDB_PARAMS) { return new Promise((resolve, reject) => { const transaction = this?.db?.transaction([store_name], "readonly"); const objectStore = transaction?.objectStore(store_name); const request = objectStore?.getAll(); if (request) { request.onsuccess = (event) => { const target = event?.target as IDBRequest; resolve(target?.result); }; request.onerror = (event) => { const target = event?.target as IDBRequest; console.log(`${store_name} 获取所有数据失败:`, target?.error?.name); reject(target?.error); }; } else { reject("get all error"); } }); } // 删 delete({ store_name, key, }: INDEXEDDB_PARAMS & { key: IDBValidKey | IDBKeyRange }) { return new Promise((resolve, reject) => { const transaction = this?.db?.transaction([store_name], "readwrite"); const objectStore = transaction?.objectStore(store_name); const request = objectStore?.delete(key); if (request) { request.onsuccess = () => { console.log("数据删除成功"); resolve("数据删除成功"); }; request.onerror = (event) => { const target = event?.target as IDBRequest; console.log("数据删除失败:", target?.error?.name); reject(target?.error); }; } else { reject("delete error"); } }); } } export default new IDB(); |
|
1 2 3 |
const height = echarts_instance.getHeight() const max_distance = (max_y - y_value) / (max_y - min_y) * height; const min_distance = (y_value - min_y) / (max_y - min_y) * height; |
Lets Encrypt是一个免费的证书授权机构(CA),其通过ACME 协议接口自动签发数字证书,来让你省去证书过期的烦恼。
ACME客户端有很多,Lets Encrypt 官网推荐Certbot ,下面是具体获取免费证书的流程:
一、安装 Certbot 客户端
[crayon-6[……]
编辑或创建文件.vimrc
vim ~/.vimrc
在.vimrc文件中开启语法高亮配置:
syntax on
使用开源库:html2canvas
|
1 2 3 4 5 6 7 8 9 10 11 12 13 14 15 16 17 18 19 20 21 22 23 24 25 26 27 28 29 30 31 32 33 34 35 36 37 38 39 40 41 42 43 44 45 46 47 48 49 50 51 52 53 54 55 56 57 58 59 60 61 62 63 64 65 66 67 68 69 70 71 72 73 74 75 76 77 78 79 80 81 82 83 84 85 86 87 88 89 90 91 92 93 94 95 96 97 98 99 100 101 102 103 104 105 106 107 108 109 110 111 112 113 114 115 116 117 118 119 120 121 122 123 124 125 126 127 128 129 130 131 132 133 134 135 136 137 138 139 140 141 142 143 144 145 146 147 148 149 150 151 152 153 154 155 156 157 158 |
<!DOCTYPE html> <html lang="zh-CN"> <head> <meta charset="UTF-8"> <meta name="viewport" content="width=device-width, initial-scale=1.0"> <title>H5滚动截长图示例</title> <script src="https://html2canvas.hertzen.com/dist/html2canvas.min.js"></script> <style> body { font-family: 'Arial', sans-serif; margin: 0; padding: 20px; background-color: #f5f7fa; } .container { max-width: 800px; margin: 0 auto; background: white; padding: 20px; border-radius: 10px; box-shadow: 0 2px 10px rgba(0,0,0,0.1); } h1 { color: #333; text-align: center; } .controls { display: flex; justify-content: center; gap: 10px; margin: 20px 0; } button { padding: 10px 20px; background: #4CAF50; color: white; border: none; border-radius: 5px; cursor: pointer; transition: background 0.3s; } button:hover { background: #45a049; } #result { margin-top: 20px; text-align: center; } #content { margin-top: 30px; padding: 20px; background: #f9f9f9; border-radius: 5px; } .section { margin-bottom: 30px; padding: 15px; background: white; border-radius: 5px; box-shadow: 0 1px 3px rgba(0,0,0,0.1); } .loading { display: none; text-align: center; margin: 20px 0; color: #666; } </style> </head> <body> <div class="container"> <h1>H5滚动截长图示例</h1> <div class="controls"> <button id="captureBtn">生成截图</button> <button id="downloadBtn" disabled>下载图片</button> </div> <div class="loading" id="loading">正在生成截图,请稍候...</div> <div id="result"></div> <div id="content"> <h2>测试内容区域</h2> <div id="longContent"></div> <div id="capter" style="height: 600px;width: calc(100% - 20px);background: orange;padding: 10px;">你好,测试截图</div> </div> </div> <script> // 生成测试内容 const longContent = document.getElementById('longContent'); for (let i = 1; i <= 20; i++) { const section = document.createElement('div'); section.className = 'section'; section.innerHTML = ` <div id="section_${i}"> <h3>第 ${i} 部分</h3> <p>这是自动生成的测试内容段落 ${i},用于演示长页面截图功能。</p> </div> `; longContent.appendChild(section); } let generatedImage = null; document.getElementById('captureBtn').addEventListener('click', async function() { const loading = document.getElementById('loading'); const result = document.getElementById('result'); const captureBtn = document.getElementById('captureBtn'); const downloadBtn = document.getElementById('downloadBtn'); loading.style.display = 'block'; result.innerHTML = ''; captureBtn.disabled = true; try { // 获取整个文档高度 const body = document.body; const html = document.documentElement; const height = Math.max( body.scrollHeight, body.offsetHeight, html.clientHeight, html.scrollHeight, html.offsetHeight ); // 使用html2canvas截图 const canvas = await html2canvas(document.querySelector("#capter"), { scale: 2, // 高清截图 scrollY: -window.scrollY, // 修正滚动位置 windowHeight: height, // 设置窗口高度为整个页面高度 useCORS: true, // 允许跨域图片 allowTaint: true, logging: true }); generatedImage = canvas.toDataURL('image/png'); result.innerHTML = `<img src="${generatedImage}" style="max-width:100%; border:1px solid #ddd; border-radius:5px;">`; downloadBtn.disabled = false; } catch (error) { console.error('截图失败:', error); result.innerHTML = `<p style="color:red;">截图失败: ${error.message}</p>`; } finally { loading.style.display = 'none'; captureBtn.disabled = false; } }); document.getElementById('downloadBtn').addEventListener('click', function() { if (!generatedImage) return; const link = document.createElement('a'); link.download = 'fullpage-screenshot.png'; link.href = generatedImage; link.click(); }); </script> </body> </html> |
芯片:Apple M2
macOS: 13.3
react-native: 0.70.0
Xcode: 14.3.1
|
1 2 3 4 5 6 7 8 9 10 11 12 13 14 15 16 17 18 19 20 21 22 23 24 25 26 27 28 29 30 31 |
#### Mac IOS 常见问题 > boost 问题修复 将 /node_modules/react-native/third-party-podspecs/boost.podspec 中对应内容修改如下: ```shell spec.source = { :http => 'https://sourceforge.net/projects/boost/files/boost/1.76.0/boost_1_76_0.tar.bz2', :sha256 => 'f0397ba6e982c4450f27bf32a2a83292aba035b827a5623a14636ea583318c41' } ``` > We ran "xcodebuild" command but it exited with error code 65. 全局将 IPHONEOS_DEPLOYMENT_TARGET 的值替换成 12.4 > "RNSScreenStackHeaderConfig" was not found in the UIManager. 1、 "react-native-safe-area-context": "^3.4.1" "react-native-screens": "3.25.0" 2、 cd ios & pod install 3、 全局将 IPHONEOS_DEPLOYMENT_TARGET 的值替换成 12.4 > make sure you`re running a package server or have included a .jsbundle file in your application bundle. 如果有提示: [oh-my-zsh] Would you like to update? [Y/n] 更新zsh后,重启ios |