|
1 2 3 4 5 6 7 8 9 10 11 12 13 14 15 16 17 18 19 20 21 22 23 24 25 26 27 28 29 30 31 32 33 34 35 36 37 38 39 40 41 42 43 44 45 46 47 48 49 |
function setCookie(cookieName, cookieValue, expires) { // 设置Cookie function getCookieName(cookieName) { //获取并返回与 cookieName 同名的 cookie 名称,允许大小写不同,如果不存在这样的 cookie,就返回 cookieName var lowerCookieName = cookieName.toLowerCase(); //转换为小写 var cookieStr = document.cookie; // 获取当前cookie if (cookieStr == "") { return cookieName; } var cookieArr = cookieStr.split(";"); var pos = -1; for (var i = 0; i < cookieStr.length; i++) { pos = cookieArr[i].indexOf("="); if (pos > 0) { if (cookieArr[i].substring(0, pos).toLowerCase() == lowerCookieName) { return cookieArr[i].substring(0, pos); } } } return cookieName; } function writeCookie(cookieName, cookieValue, expires) { // 写cookie,不区分大小写 if (expires) { document.cookie = getCookieName(cookieName) + "=" + escape(cookieValue) + "; expires=" + expires.toGMTString(); } else { document.cookie = getCookieName(cookieName) + "=" + escape(cookieValue); } } function readCookie(cookieName, defaultValue) { //获取并返回 cookie 值,不区分大小写 var lowerCookieName = cookieName.toLowerCase(); var cookieStr = document.cookie; if (cookieStr == "") { return defaultValue; } var cookieArr = cookieStr.split("; "); var pos = -1; for (var i = 0; i < cookieArr.length; i++) { pos = cookieArr[i].indexOf("="); if (pos > 0) { if (cookieArr[i].substring(0, pos).toLowerCase() == lowerCookieName) { return unescape(cookieArr[i].substring(pos + 1, cookieArr[i].length)); } } } return defaultValue; } writeCookie(cookieName, cookieValue, expires); } |
git clone 出错 fatal: pack has bad object at offset 26060927: inflate returned -3
$ git clone http://xxx.xxx.cn/liyafei/developer.git
Cloning into ‘developer’…
remote: Counting objects: 10681, done.
remote: Compressing objects:[……]
Git分支操作
查看本地分支:git branch -t
合并本地两个分支:git merge branchOne branchTwo
切换分支:git checkout branchName
将本地指定分支推送到远程指定仓库指定分支: git push 远程仓库地址 本地指定分支:远程指定分支[……]
原生ajax方法封装
|
1 2 3 4 5 6 7 8 9 10 11 12 13 14 15 16 17 18 19 20 21 22 23 24 25 26 27 28 29 30 31 32 33 34 35 36 37 38 39 40 41 42 43 44 45 46 47 48 49 50 51 52 53 54 55 56 57 58 59 60 61 62 63 64 65 66 67 68 69 70 71 72 73 74 75 76 77 78 79 80 81 82 83 84 85 86 87 88 89 90 91 92 93 94 95 96 97 98 99 100 101 102 103 104 105 106 107 108 109 110 111 112 113 114 115 116 117 |
/** * @function ajax request * @fields ajaxName:请求名称,method:请求方法,headers:setRequestHeader自定义部分,url:接口地址,async:是否异步请求,withCredentials:是否支持跨域发送cookie,dataType:数据类型 ,data:post请求参数 * @param data:{ajaxName:"ajaxNameString",headers:{},method:"GET/POST",url:"",async:true/false,withCredentials:true/false,dataType:"json",data:""} * @result ajaxName.responseText */ function ajaxRequest (data, callback) { data = data || {} data.dataType = data.dataType || 'json' var sendParams = null var headers = data.headers || {} var ajax = data.ajaxName // 新建请求 if (window.XMLHttpRequest) { ajax = new XMLHttpRequest() } else { ajax = new ActiveXObject('Microsoft.XMLHTTP') } // 打开请求 ajax.open(data.method.toUpperCase(), data.url, data.async) // 是否支持跨域发送cookie ajax.withCredentials = data.withCredentials ajax.setRequestHeader("Content-type", data.contentType || "application/x-www-form-urlencoded") // POST请求设置 if (data.method == 'POST') { for (var i in headers) { ajax.setRequestHeader(i, headers[i]) } if (data.data) { sendParams = data.data } } // 发送请求 ajax.send(sendParams ? sendParams : null) // 注册事件 ajax.onreadystatechange = function () { if (window.location.origin + '/login/index' === ajax.responseURL) { window.location.reload() window.location.href = window.location.origin + '/login/index' return } callback(ajax) } } /** * GET * @param ajaxName 请求名称 * @param requestUrl 请求接口地址 * @param async 是否异步请求 * @param callBack 回调函数 * @param contentType 请求类型 */ function ajaxGetData (ajaxName, requestUrl, async, callBack, contentType) { ajaxRequest({ ajaxName: ajaxName, contentType: contentType || "application/json;charset=utf-8", method: "GET", url: requestUrl, async: async, cache: false, withCredentials: true, dataType: "json" }, function callback (ajax) { if (ajax.status == 200 && ajax.readyState == 4) { callBack(ajax.responseText) } }) } /** * 拼接GET请求url参数 * @param url * @param params * @returns {string} */ function formateGetUrl (url, params) { var resultParams = '' for (var key in params) { resultParams = resultParams + '&' + key + '=' + params[key] } return url + '?' + resultParams.substr(1) } /** * POST * @param ajaxName 请求名称 * @param requestUrl 请求接口地址 * @param async 是否异步请求 * @param callBack 回调函数 * @param contentType 请求类型 */ function ajaxPostData (ajaxName, requestUrl, params, async, callBack, contentType) { var resultParams = '' if (!contentType || contentType === "application/x-www-form-urlencoded;charset=utf-8") { for (var key in params) { resultParams = resultParams + '&' + key + '=' + encodeURIComponent(params[key]) } } else { resultParams = params && JSON.stringify(params) } ajaxRequest({ ajaxName: ajaxName, headers: {}, contentType: contentType || "application/x-www-form-urlencoded;charset=utf-8", method: "POST", dataType: "json", url: requestUrl, processData: true, async: async, data: resultParams }, function callback (ajax) { if (ajax.status == 200 && ajax.readyState == 4) { callBack(ajax.responseText) } }) } |
微信小程序base64编码解码以及utf-8解码
|
1 2 3 4 5 6 7 8 9 10 11 12 13 14 15 16 17 18 19 20 21 22 23 24 25 26 27 28 29 30 31 32 33 34 35 36 37 38 39 40 41 42 43 44 45 46 47 48 49 50 51 52 53 54 55 56 57 58 59 60 61 62 63 64 65 66 67 68 69 70 71 72 73 74 75 76 77 78 79 80 |
function base64_encode (str) { // 编码,配合encodeURIComponent使用 var c1, c2, c3; var base64EncodeChars = "ABCDEFGHIJKLMNOPQRSTUVWXYZabcdefghijklmnopqrstuvwxyz0123456789+/="; var i = 0, len = str.length, strin = ''; while (i < len) { c1 = str.charCodeAt(i++) & 0xff; if (i == len) { strin += base64EncodeChars.charAt(c1 >> 2); strin += base64EncodeChars.charAt((c1 & 0x3) << 4); strin += "=="; break; } c2 = str.charCodeAt(i++); if (i == len) { strin += base64EncodeChars.charAt(c1 >> 2); strin += base64EncodeChars.charAt(((c1 & 0x3) << 4) | ((c2 & 0xF0) >> 4)); strin += base64EncodeChars.charAt((c2 & 0xF) << 2); strin += "="; break; } c3 = str.charCodeAt(i++); strin += base64EncodeChars.charAt(c1 >> 2); strin += base64EncodeChars.charAt(((c1 & 0x3) << 4) | ((c2 & 0xF0) >> 4)); strin += base64EncodeChars.charAt(((c2 & 0xF) << 2) | ((c3 & 0xC0) >> 6)); strin += base64EncodeChars.charAt(c3 & 0x3F) } return strin } function base64_decode (input) { // 解码,配合decodeURIComponent使用 var base64EncodeChars = "ABCDEFGHIJKLMNOPQRSTUVWXYZabcdefghijklmnopqrstuvwxyz0123456789+/="; var output = ""; var chr1, chr2, chr3; var enc1, enc2, enc3, enc4; var i = 0; input = input.replace(/[^A-Za-z0-9\+\/\=]/g, ""); while (i < input.length) { enc1 = base64EncodeChars.indexOf(input.charAt(i++)); enc2 = base64EncodeChars.indexOf(input.charAt(i++)); enc3 = base64EncodeChars.indexOf(input.charAt(i++)); enc4 = base64EncodeChars.indexOf(input.charAt(i++)); chr1 = (enc1 << 2) | (enc2 >> 4); chr2 = ((enc2 & 15) << 4) | (enc3 >> 2); chr3 = ((enc3 & 3) << 6) | enc4; output = output + String.fromCharCode(chr1); if (enc3 != 64) { output = output + String.fromCharCode(chr2); } if (enc4 != 64) { output = output + String.fromCharCode(chr3); } } return utf8_decode(output); } function utf8_decode (utftext) { // utf-8解码 var string = ''; let i = 0; let c = 0; let c1 = 0; let c2 = 0; while (i < utftext.length) { c = utftext.charCodeAt(i); if (c < 128) { string += String.fromCharCode(c); i++; } else if ((c > 191) && (c < 224)) { c1 = utftext.charCodeAt(i + 1); string += String.fromCharCode(((c & 31) << 6) | (c1 & 63)); i += 2; } else { c1 = utftext.charCodeAt(i + 1); c2 = utftext.charCodeAt(i + 2); string += String.fromCharCode(((c & 15) << 12) | ((c1 & 63) << 6) | (c2 & 63)); i += 3; } } return string; } |
阿里云域名申请免费的SSL证书
地址:https://common-buy.aliyun.com/?spm=a2c4e.11155515.0.0.DjCjOv&commodityCode=cas#/buy
第一步:

第二步:
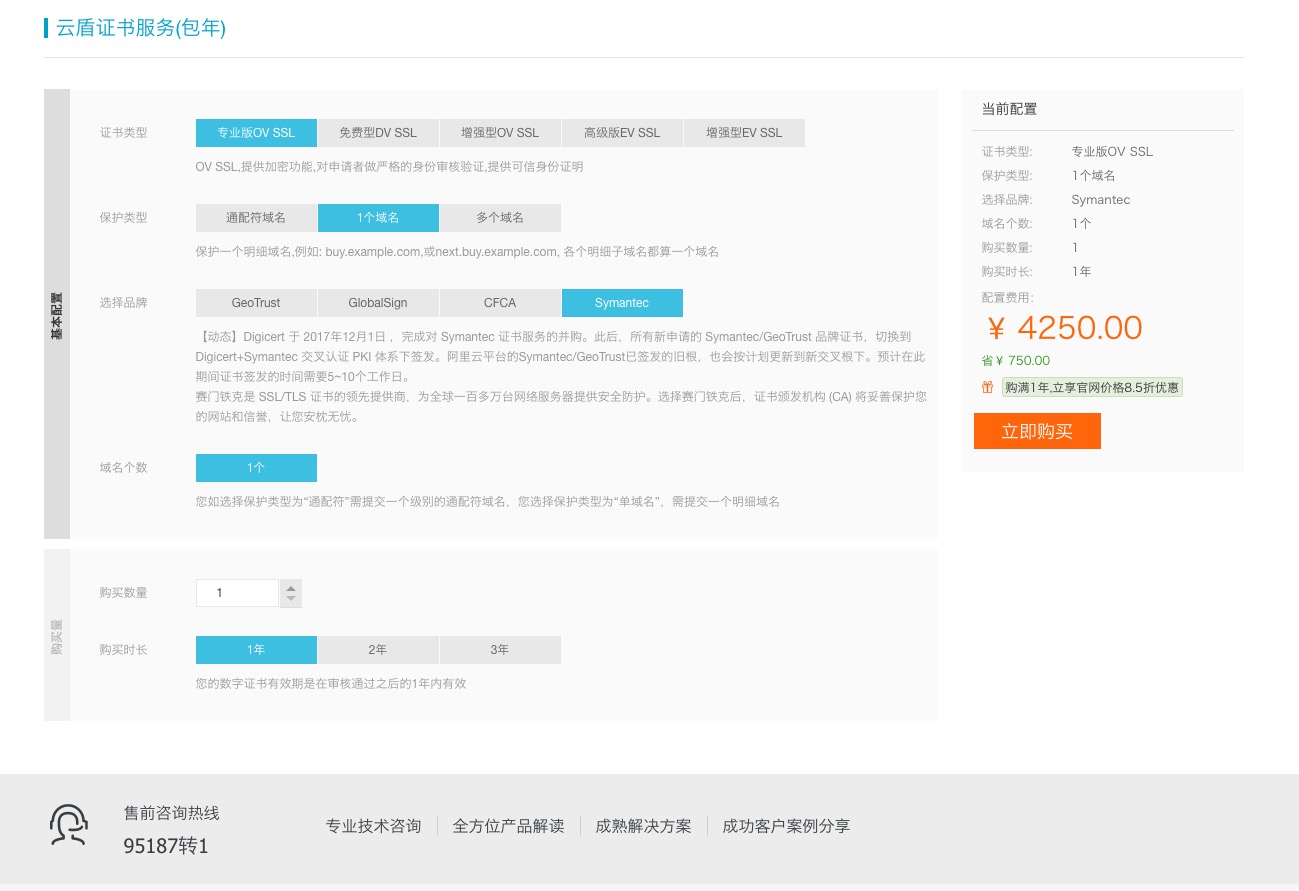
第三步:

第四步:点击证书控制台

第[……]
JS格式化时间(支持小程序,兼容IOS)
|
1 2 3 4 5 6 7 8 9 10 11 12 13 14 15 16 17 18 19 20 21 22 23 24 25 26 27 28 29 30 31 32 33 34 35 36 37 38 39 40 41 42 43 44 45 46 47 48 |
const REGEX = /(\d{4})-(\d{2})-(\d{2})T(\d{2}):(\d{2}):(\d{2})/ /** * @function format time * @param val, format * @return {string} * @example * <template> * <div> * <span>{{item.time | formatTime('yyyy/MM/dd hh:mm:ss')}}</span> * </div> * </template> * import {formatTime} from '../../library/timeFormat' * export default { * filters: {formatTime} * } */ export const formatTime = (val, format) => { if (val) { /** * @instructions 如果不是时间戳格式,且含有字符 '-' 则将 '-' 替换成 '/' && 删除小数点及后面的数字 * @reason 将 '-' 替换成 '/' && 删除小数点及后面的数字 的原因是safari浏览器仅支持 '/' 隔开的时间格式 */ if (val.toString().indexOf('-') > 0) { val = val.replace(/T/g, ' ').replace(/\.[\d]{3}Z/, '').replace(/(-)/g, '/') // 将 '-' 替换成 '/' val = val.slice(0, val.indexOf('.')) // 删除小数点及后面的数字 } let date = new Date(val) date.setHours(date.getHours() + 8) const [whole, yy, MM, dd, hh, mm, ss] = date.toISOString().match(REGEX) const year = new Date().getFullYear() const month = new Date().getMonth() + 1 const dates = new Date().getDate() if (format) { return format .replace('yyyy', yy) .replace('yy', yy.slice(2)) .replace('MM', MM) .replace('dd', dd) .replace('hh', hh) .replace('mm', mm) .replace('ss', ss) } else { return [yy, MM, dd].join('-') + ' ' + [hh, mm, ss].join(':') } } else { return '--' } } |
微信小程序使用原生WebSokcet实现断线重连及数据拼接
理解[].forEach.call()
|
1 2 3 4 5 6 7 8 9 10 11 12 13 14 15 16 17 |
例子: let cols = document.querySelectorAll('ul li') [].forEach.call(cols, function (col, index) { // TODO } 分析: ① []是一个空数组,无论这个数组里的最初值是什么,它们都不会被使用到; ② forEach方法是一个数组方法,只有数组才能调用;完整写法:Array.prototype.forEach,Array.forEach为简写; ③ call方法: 语法:fun.call(thisArg, arg1, arg2, ...) 参数:thisArg:在 fun 函数运行时指定的this值; arg1, arg2, ... : 指定的参数列表; 综上:[]这个空数组里的值(当然,它没有值)是最初的this值,通过call方法,当这个空数组调用方法forEach时, cols里的值会取代空数组原先的this值。 通俗的说,就是cols需要使用forEach这个方法, 但是这个方法是一个数组方法,只有数组才能调用,于是通过call方法来了个偷梁换柱, 在数组调用forEach方法的时候,将数组里的this值替换成了cols的值,达成了目的。 |
使用WebDriverAgent中遇到的问题
|
1 2 3 4 5 6 7 8 9 10 11 12 13 14 15 16 17 18 19 20 21 22 23 24 25 26 27 28 29 30 31 32 33 34 35 36 37 38 39 40 41 42 43 44 45 46 47 48 49 50 51 52 53 54 55 |
首先克隆:git clone https://github.com/facebook/WebDriverAgent.git 在执行命令: ./Scripts/bootstrap.sh 时报错: Please make sure that you have Carthage installed (https://github.com/Carthage/Carthage) Note: We are expecting that carthage installed in /usr/local/bin/ 安装carthage:brew install carthage 执行 ./Scripts/bootstrap.sh 仍报同样的错,再次安装carthage提示: Warning: carthage 0.27.0 is already installed, it's just not linked. You can use `brew link carthage` to link this version. 执行:brew link carthage 报: Linking /usr/local/Cellar/carthage/0.27.0... Error: Permission denied @ dir_s_mkdir - /usr/local/Frameworks 提权:sudo brew link carthage 报: Error: Running Homebrew as root is extremely dangerous and no longer supported. As Homebrew does not drop privileges on installation you would be giving all build scripts full access to your system. 原因可能是我刚把系统升级到 macOS High Sierra 10.13.2 搜到一大把解决方法: 1、sudo chown -R $(whoami) $(brew --prefix)/* 2、sudo chown -R $(whoami) /usr/local/* 3、brew upgrade 4、Uninstall Homebrew: /usr/bin/ruby -e "$(curl -fsSL https://raw.githubusercontent.com/Homebrew/install/master/uninstall)" Then re-install it: /usr/bin/ruby -e "$(curl -fsSL https://raw.githubusercontent.com/Homebrew/install/master/install)" 第四个没试,前三个都试了一遍,brew link carthage仍然报错,但是 ./Scripts/bootstrap.sh 可以执行了。 依赖安装完以后,双击WebDriverAgent.xcodeproj这个文件,会在Xcode中对应打开。 紧接着证书签名: 勾选 Automatically manage signing 然后选择Team 登录你的 Apple ID 下载证书。 在TARGETS里面选中WebDriverAgentLib: <img src="http://skillnull.com/wp-content/uploads/2018/01/131514876676_.pic_hd-1.jpg" alt="" width="1878" height="1057" /> 在TARGETS里面选中WebDriverAgentRunner: <img src="http://skillnull.com/wp-content/uploads/2018/01/141514876772_.pic_hd.jpg" alt="" width="1878" height="1057" /> 报错了,修改BundleID: <img src="http://skillnull.com/wp-content/uploads/2018/01/111514876450_.pic_hd.jpg" alt="" width="1878" height="1057" /> <img src="http://skillnull.com/wp-content/uploads/2018/01/121514876645_.pic_.jpg" alt="" width="626" height="19" /> <img src="http://skillnull.com/wp-content/uploads/2018/01/151514877046_.pic_hd.jpg" alt="" width="1878" height="1057" /> 报错解决。 接着在菜单栏中选择Product=>Destination=>你的手机,Product=>Scheme=>WebDriverAgentRunner,最后Product=>Test 运行。 |